We may earn money or products from the companies mentioned in this post.
Note: This is part 7 of a continuing series (currently up to 12 entries). I’m making an old post public each time I make a new one for patrons (so when Part 12 goes up, Part 7 will go public). If you don’t want to wait, become a patron! You can find out more about Khezvaros, The City of Ten Thousand Daggers, at World Anvil.
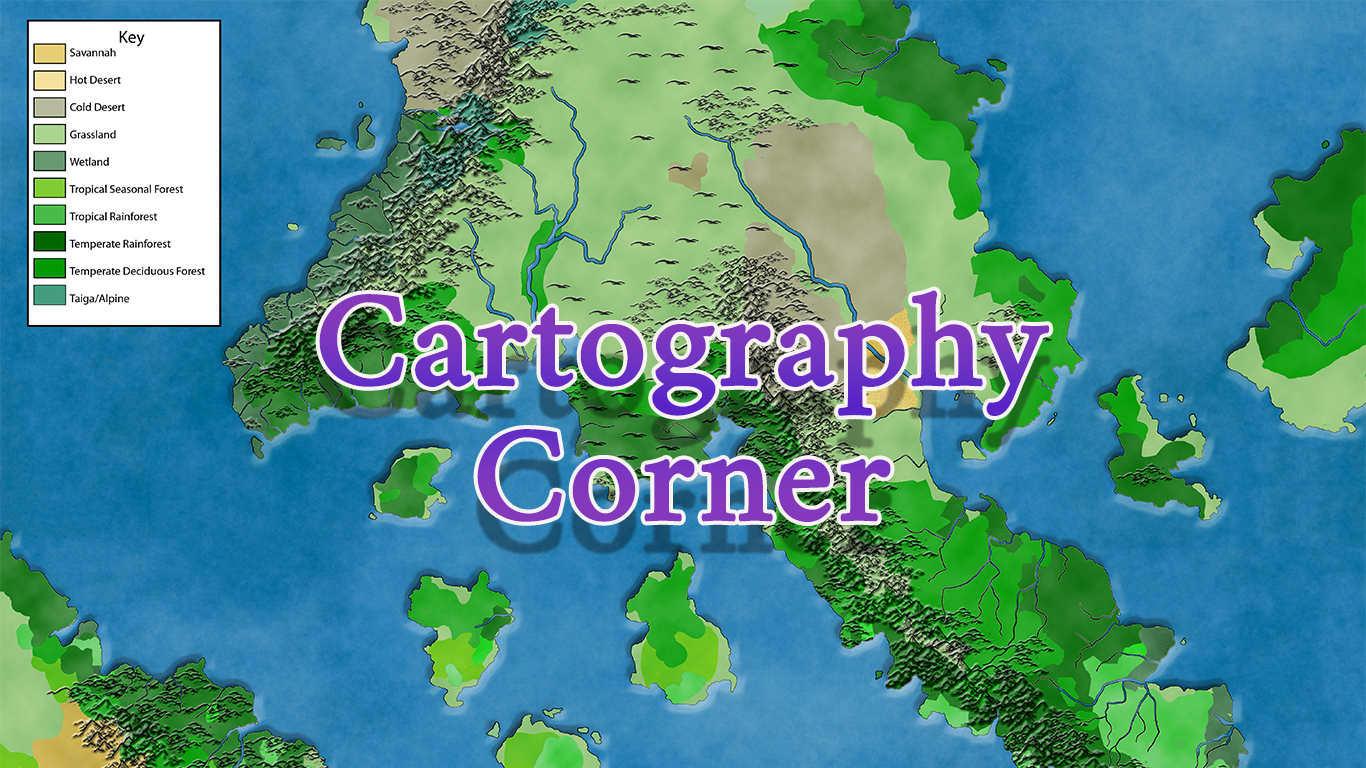
Last time around, I finished tweaking the climate and biomes aspects of my map with Fantasy Map Generator. I could (maybe even should) just stop there, but I’m trying to learn more about making maps, so that map is just going to serve as a template. Here’s a web-sized version of the image file I’m starting with:

Way back in part one, I’d started my map-making journey with the Designing Maps page tutorial by Jorm, and that’s what I’m going back to now. The main difference is that I’ll have an extra layer with the map above that I’ll use as a guide when I build my landforms.
Before I do that, though, I need to figure out how to crop the map. Jorm recommends 4000 x 6000 pixels for a world-sized map, but I’m going to defy his recommendation and go with 4500 x 6000 because any print version of this will likely be a single page in a book and 4500 x 6000 gives it the same ratio as 7.5 x 10 (a standard page minus 1/2″ margins). I create my new working file, copy the Map Generator map over as a new layer, then drag and resize it until I’ve got the parts I’m interested in:

Now I follow along with Jorm’s guidelines. He’s actually got a “trace a map” option for creating your landmasses, but the Map Generator landforms are a little smooth and rounded for my tastes so I’m going to use a combination of the random generation option and the trace option to make the coastlines a bit more jagged. I start by creating my water layer, coastline sources layer, and “landmass working” folder. Once they’re all set, I move my template into my landmass folder (that way it will disappear when I hide the folder to switch back and get a new chunk from the coastline sources), lower the opacity, and prepare to do a lot of copying, pasting, and switching layers on and off.
I turn off the water layer for now, then repeat these basic steps:
1) Turn off Coastline Sources.
2) Study a section of coastline on the template map.
3) Turn off the Landmass Working folder, turn on the Coastline Sources, and find something there that matches the section of coastline I’m looking at. At this point I find that with the template at 78% opacity, I can still see the coastline sources well enough to keep them both open at the same time, making the matching a bit easier. I move the Template up out of the Landmass folder upon discovering this.
4) Copy the section I need. Jorm says to then deselect it, but in his process you’re only using a handful of coastline sources chunks to build your continent. Since I’m going to be using a bunch of smaller chunks, I’m going to delete each section I use to avoid repeating sections. I can always create a new Coastline Sources layer if I need it.
5) Turn off Coastline Sources, turn the Landmass Working folder back on, and paste the section of coastline along the matching coastline of my template (keep the template at the top of the folder).
6) Return to step 1.
Here’s what it looks like after I’ve pasted in 8 chunks of coastline (and moved the map to the bottom with full opacity to make comparison a little easier).

Now I just have to keep repeating the process until all my continents and islands are outlined. That’s going to take a while, so I’m going to end this post here and come back when I’ve got all the coastlines roughed in.