We may earn money or products from the companies mentioned in this post.
Note: This is part 3 of a continuing series (part 8 will go up for patrons later today). I’m making an old post public each time I make a new one for patrons (so when Part 9 goes up, Part 4 will go public). If you don’t want to wait, become a patron! You can find out more about Khezvaros, The City of Ten Thousand Daggers, at World Anvil.
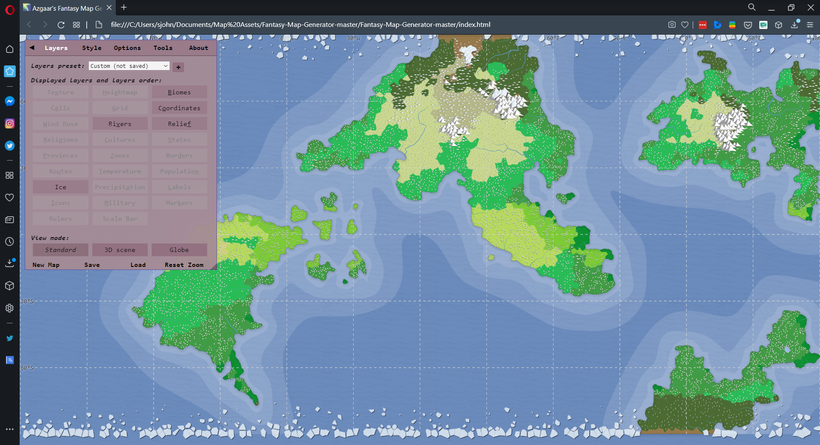
After playing around with my height map in Photoshop, I end up with this:
Now I need to see how this map looks once Azgaar’s runs its climate magic, so I load the heightmap up into that program. Here it is once it’s converted:

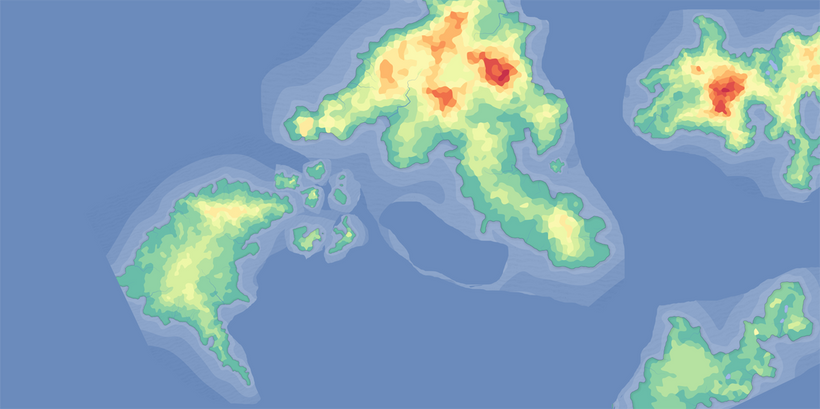
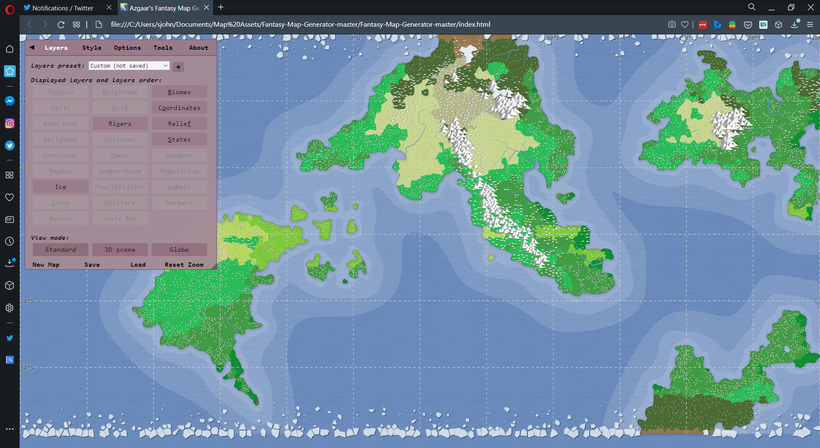
To see what the climate zones look like, I exit the editor (Customization). I also turn on visibility for the “Coordinates” and “Relief” layers, which will give me a grid and show the difference between flat ground, mountains, and hills. I have a vague idea of which height map colors mean what: greens are low ground, yellows are hills, and oranges are mountains (with red at the highest points); but the relief helps me tell where hills turn into mountains or flat ground. Here’s that map:
Now I’m ready to start editing the map. I know I want some mountains in the tropical (dark yellow-green) areas so they can grow some sweet, sweet coffee. I also want some mountains and hills a bit closer to Khezvaros for that rugged Frank Miller Greece look. All editing is done on the heightmap screen above, so I go back there by clicking Tools–>Heightmap on the menu window.
I’m not going to go into the details of how the Fantasy Map Generator works. You can get a good overview here. But here are the basic options (covered in the “Heightmap Customization” section of the documentation if you want more information) I’ll be using:

Before I actually start editing, I save what I’ve currently got as a new .map file so I can go back to where I started if I screw something up too bad to fix. Then I go back into the heightmap customization to start building some mountains.
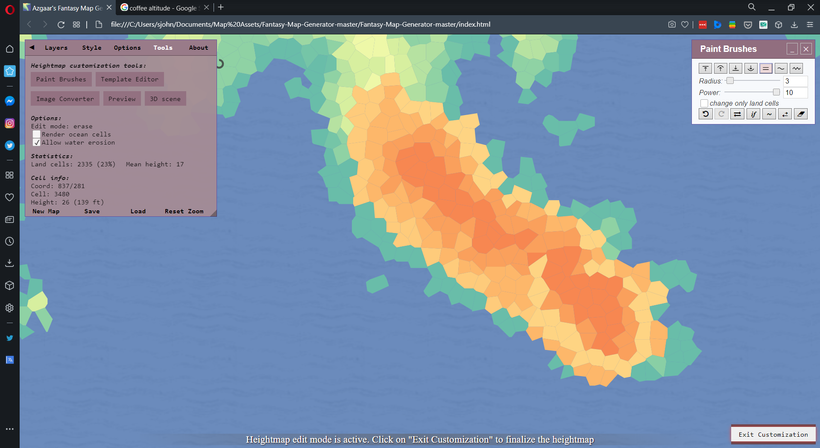
Since two of the mountain ranges I’m going to include will be there for the sake of “realism,” I need to do some “research.” This consists of a Google search that tells me coffee grows at altitudes of 3500-6000 feet, with higher altitudes producing better coffee. Knowing that, I’ve just got to figure out what colors correspond to what altitudes. Fortunately, the Fantasy Map Generator will tell me. At the bottom of the tool menu box, there’s a “Height” entry (red arrow). On the screenshot below, my mouse pointer (white arrow) is on the second reddest of the red-orange cells in the largest clump of mountains on the main continent, which is 6524 ft. The darkest red is 7597 feet.

Checking some other heights, I see that most of the coffee altitudes are in the “mostly orange” range, with darker oranges meaning higher altitudes. I decide I want to keep the mountains on the main continent in the lower range, say 3500-4500 feet, while the ones on the southwest island are going to be high mountains (6,000 feet plus), which explains why the coffee form the island is valued by the empire despite lots of coffee-growing land to the south. The peninsular stuff was fine when the Empire was young and didn’t know shit, but once they tasted that sweet, sweet island coffee, it was time for some westward expansion.
Back in the editor, I’m going so zoom in close on the southern peninsula of the map and set my raise brush to a low radius (3) and high power (10) and start raising the altitude a couple of cells at a time until I’ve got a selection of different shades of orange. Then I’m going to use the align brush to drag those colors out into a mountain range, starting with the darkest colors in the middle and the lighter colors outlining them. I don’t worry if it’s a little sloppy, because mountain ranges aren’t a uniform height. Also, I’ll be mixing them up in the next step. Here’s the rough outline of the range:
After getting the mountain range roughed in, I run a large (33) but low power (1) Disrupt brush over the whole thing a couple times. Then I do a Smooth brush at the same settings. Then I jump out of the editor to see what things look like.
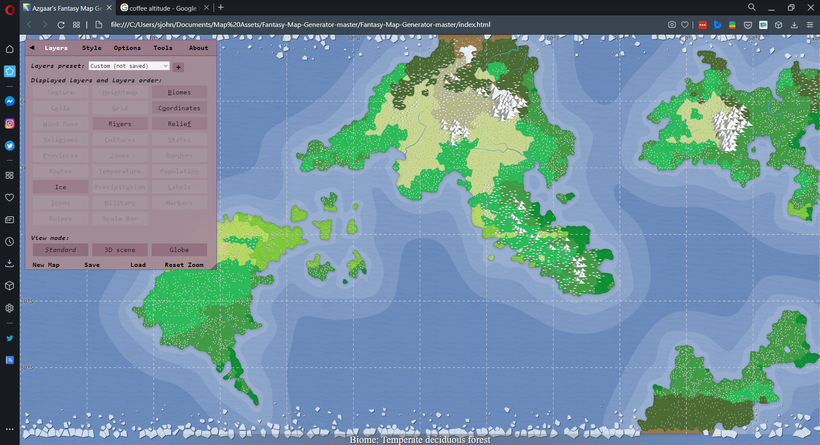
Ok, so not exactly what I wanted. I’ve got a few chunks of tropical rainforest on the western side of the continent now, but all that dark yellow-green on the other side has turned to either temperate rainforest or wetlands. When I go back into the editor and compare where those are (as well as where the few remaining blotches of rainforest are, it looks like the areas showing as temperate are too high and the wetlands are too low. I do some more editing to try to bring them mostly into the light orange/dark yellow range.
I continue to experiment for a while, trying to find the sweet spot with the largest chunk of land with the right combination of altitude and climate. Basically, I need a tropical rainforest with at least hills. In the process I completely mess up my map, but that’s why I saved a copy before I started mucking about.
After I’ve played around with it a while, I determine that there’s no way to get the right altitude without severely cutting down on the amount of tropical rainforest. I decide that’s fine–even more reason to go west for coffee–but still play around until I figure out how to get the largest swath of tropical rainforest with hills. Once I have a good idea of what I need to do, I go back to my last save point and paint a range of mountains along the peninsula that joins up with the smaller clump near the middle of the continent. The end result looks like this:
Now that I’ve got the first range looking more or less like I want it, I save a new .map file so I can come back after I screw up my other edits. I know I need mountains and hills on Coffee Island, I want more hills to the east of Khezvaros and fewer to the west, and I’m also going to see what I can do to move the forest on the western edge of the continent a little farther from the river. Once I get everything looking good, I’ll come back here for another post.